WebSocket(Socket.io)を触ってみる(チャットアプリの作成まで)
HTML5 Conference 2012やJavaScriptの本を見てるとWebSocketを使って何かしたくなったので早速始めてみる。
WebSocketを使うにはnode.jsでSocket.IOを使うのが一番良さそう。ということで色々解説記事などを漁って試してみたけど、バージョンの違いのせいかなかなか動かせない。仕方ないので公式サイトを見ながらぼそぼそとやっていくことにした。
使った環境
- Mac(OS X 10.7.4)
- node.js v0.6.21-pre
- Express 3.0.0rc4
- Socket.IO 0.9.10
環境構築
前にほんのちょっとだけnodeやexpressなんかをいじっていたおかげで大体の環境は整っていた。とりあえず各々のバージョンを上げてやる。
$ nvm install v0.6.21
$ npm update express -g
これで node v0.6.21とexpress 3.0.0rc4が入った。
アプリの作成
$ express socketio_test -e
$ cd socketio_test
ejsを使う。
npm installする前にpackage.jsonをいじってsocket.ioもインストールするようにする。こういうのに後方互換性が無いことはもう痛いほど分かったので、*ではなくきちんとバージョンを指定する。
{
  "name": "application-name",
  "version": "0.0.1",
  "private": true,
  "scripts": {
    "start": "node app"
  },
  "dependencies": {
    "socket.io": "0.9.10",  // 追加
    "express": "3.0.0rc4",
    "ejs": "*"
  }
}
編集
とりあえずGitHubのコードを写していく。ただし幾つか変更点がある。
ポート番号の変更
サンプルのコードでは80番ポートを指定しているけど、特権ポートを使用するにはsudoコマンドを使う必要があるらしくて面倒なので、適当に8000番ポートを使用するように変更する。
appの設定の変更
ここらへんはかなりあやふやで、まあ動いてるからいいかという感じでやったから間違ってるかもしれない。
まず前提として、
- Socket.IOの
listen()にはhttp.Serverを渡さないといけない。 - express3.0から
express()の戻り値がhttp.Serverのインスタンスではなくなった。(※参考) - なので、自前で
server=http.createServer(app)してそのインスタンスを渡す必要がある。 - 最後に
server.listen(8000)でポートを設定する。
ここまではほぼサンプル通りであってるはず。だけど、これだけだとポート関連がぐちゃぐちゃして結局うまく動かせない(サーバーが二つ?建っちゃったり、EADDRINUSEになっちゃったり)。
なので「ひょっとしたら、自前でserver作ったし、ポートも指定したからappの方ではそういう設定しなくてもいい?」と思って
app.set('port', process.env.PORT || 3000);の行をコメントアウトしてみる
と、一応ちゃんと動いてくれるようになった。(追記あり)
最終的に
app.jsとindex.ejsのコードは次のようになった。
/**
 * Module dependencies.
 */

var express = require('express')
  , routes = require('./routes')
  , user = require('./routes/user')
  , http = require('http')
  , path = require('path');

var app = express()
  , server = http.createServer(app)
  , io = require('socket.io').listen(server);

server.listen(8000);

io.sockets.on('connection', function (socket) {
  socket.emit('news', { hello: 'world' });
  socket.on('my other event', function (data) {
    console.log(data);
  });
});


app.configure(function(){
  // app.set('port', process.env.PORT || 3000);
  app.set('views', __dirname + '/views');
  app.set('view engine', 'ejs');
  app.use(express.favicon());
  app.use(express.logger('dev'));
  app.use(express.bodyParser());
  app.use(express.methodOverride());
  app.use(app.router);
  app.use(express.static(path.join(__dirname, 'public')));
});

app.configure('development', function(){
  app.use(express.errorHandler());
});

app.get('/', routes.index);
app.get('/users', user.list);

http.createServer(app).listen(app.get('port'), function(){
  console.log("Express server listening on port " + app.get('port'));
});
<!DOCTYPE html>
<html>
  <head>
    <title><%= title %></title>
    <link rel='stylesheet' href='/stylesheets/style.css' />
    <script src="/socket.io/socket.io.js"></script>
    <script>
      var socket = io.connect('http://localhost');
      socket.on('news', function (data) {
        console.log(data);
        socket.emit('my other event', { my: 'data' });
      });
      socket.on("say", function(data){
        console.log(data)
      })
    </script>
  </head>
  <body>
    <h1><%= title %></h1>
    <p>Welcome to <%= title %></p>
  </body>
</html>
追記
見直してみたら簡単な話だった。とりあえず修正版のapp.jsのコード
/**
 * Module dependencies.
 */

var express = require('express')
  , routes = require('./routes')
  , user = require('./routes/user')
  , http = require('http')
  , path = require('path');

var app = express();

app.configure(function(){
  app.set('port', process.env.PORT || 8000);
  app.set('views', __dirname + '/views');
  app.set('view engine', 'ejs');
  app.use(express.favicon());
  app.use(express.logger('dev'));
  app.use(express.bodyParser());
  app.use(express.methodOverride());
  app.use(app.router);
  app.use(express.static(path.join(__dirname, 'public')));
});

app.configure('development', function(){
  app.use(express.errorHandler());
});

app.get('/', routes.index);
app.get('/users', user.list);

var server = http.createServer(app).listen(app.get('port'), function(){
  console.log("Express server listening on port " + app.get('port'));
});

var io = require('socket.io').listen(server);

io.sockets.on('connection', function (socket) {
  socket.emit('news', { hello: 'world' });
  socket.on('my other event', function (data) {
    console.log(data);
  });
});
動かしてみる
なんとか動くようにはなったので、早速localhost:8000にアクセスしていじってみる。
とりあえずChromeからShit+Ctrl+Jでコンソールを開いてみると、早速ハローワールドオブジェクトが送られているのが分かる。お返しにとsocket.emit("my other event", "aaa")とコンソールに入力してクライアント側からイベントを起こしてやるとサーバーのログにきちんとaaaと表示される。すごい!
終わりに
以上でなんとかSocket.IOが扱えるようになった。Socket.IOのAPIは、on()でイベントハンドラを追加したり、emit()で任意のイベントを発生させたり、broadcastやjsonといったフラグを挟むことで振る舞いを変えたりと単純明快。早速チャットアプリでも作ってみようっと。
チャットアプリ
というわけでチャットアプリについてはまた別記事で書こうと思ってたんだけど、あまりにも簡単にできてしまったので同じ記事に書く。やったことといえばサーバーサイドはイベントハンドラを少し書き換えて、クライアントサイドはちょっとHTMLいじってjQueryをちょちょっと使っただけ。これだけでできるなんて、改めてすごい!と思った。
ソース一式はこちらに BlackKetchupTea512 / simple_chat_room
追記
Sublime Text 2 にパッケージを導入する
この記事ではSublime Text 2 にパッケージ(プラグイン)を入れる方法を紹介します。
パッケージを導入する方法は大まかに言って2つあります。手動でパッケージをダウンロードしてきてInstalled Packagesに入れる方法とPackage Controlというパッケージを使う方法です。
Package Controlを使う方法がとても便利なので普段はこれを使っていればいいのですが、Package Control自体がパッケージなので、まずはこのパッケージを手動で導入してみることにしましょう。
手動インストール(Package Controlの導入)
手動インストールといってもやり方は簡単です。インストールしたいパッケージのsublime-packageファイル(パッケージをzip形式で固めたもの)をダウンロードしてきてInstalled Packagesフォルダに置いてSublime Text 2 を再起動するだけです。
これだけすれば、あとは勝手にSublime Text 2 がInstalled Packagesフォルダのsublime-packageファイルを解凍してPackagesフォルダに展開してくれます。もちろん自分でsublime-packageファイルを解凍してPackagesフォルダに置いても問題ありません(むしろこっちのほうが正式なインストール方法のような気も...)。
Installed Packagesフォルダの場所は、OSによって違うので少しややこしいですが、メニューのPreferencesタブのBrowse Packages…からPackagesフォルダを開いてそのフォルダの一つ上の階層に行けば見つかります。
Package Controlのsublime-packageファイルはこのページの下のほう、「Manual Instructions」のセクションにあります。
インストールできたでしょうか。Shit+Ctrl+Pからコマンドパレットを開いてpackage controlと入力して、下の図のようにPackage Controlのコマンドが見つかればインストールに成功しています。
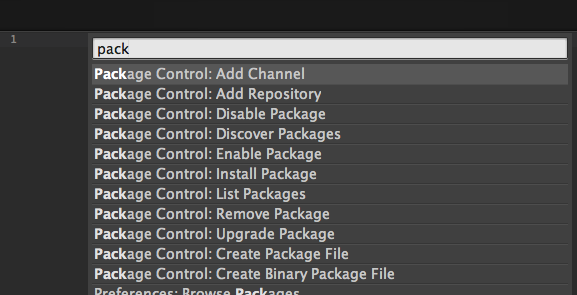
インストールできてないという人は、Package Controlインストール用に専用のスクリプトが用意されているのでそちらをSublime Text 2 のConsoleに入力して再起動してみてください。詳細はこのページのInstallationにあります。
Package Controlを使ったインストール
Package Controlを使ったパッケージのインストールは実に簡単です。パッケージの指定には、GitHubやBitBucketのURLを指定する方法と、あらかじめ用意されているインストール可能リストの中から選ぶ方法の二種類があります。
インストール可能リストの中から選ぶ方法
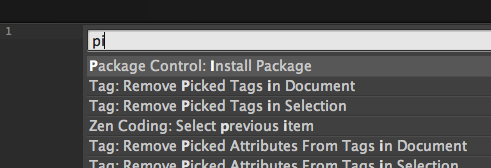
まずShift+Ctrl+Pでコマンドパレットを開きます。「pi」と入力してコマンド候補の中から「Package Control: Install Package」を選びます。こうするとパッケージのリストが表示されるので、好きなパッケージを選んでインストールすることができます。
GitHubやBitBucketのURLを指定する方法
GitHubやBitBucket上のリポジトリのURLを指定することでもパッケージをインストールできます。「Package Control: Add Repository」コマンドを選んでリポジトリのURLを入力しましょう。
Sublime Text 2 関連一覧
Sublime Text 2 の設定をいじる
前の記事でデフォルトの設定ファイルを眺めたので早速設定をいじってみましょう。
ではメニューの 「Preferences」から「Settings - User」を開きましょう。おそらく次のような内容が表示されていると思います(空だった場合はコピーして貼り付けておいてください)。
// Settings in here override those in "Default/Preferences.sublime-settings", and
// are overridden in turn by file type specific settings.
{
}ここの設定は"Default/Preferences.sublime-settings"の設定を上書きします。また、ここの設定は言語ごとの設定に上書きされます。
デフォルトの設定ファイルと同じように、このファイルの{}の中に設定のプロパティを書いていきます。とはいえ Sublime Text 2 はデフォルトの設定のままでもかなり使いやすいのでそれほどいじる項目は多くありません。とりあえず設定ファイルの一例を挙げておきます。
{
  "color_scheme": "Packages/Color Scheme - Default/Sunburst.tmTheme",

  "font_face": "Courier",
  "font_size": 12.2,
  "font_options": "",

  "scroll_speed": 5.0,
  "scroll_past_end": true,

  "fade_fold_buttons": false,
  "bold_folder_labels": true,

  "word_wrap": false,
  "margin": -5,
  "rulers":[80],
  "tab_size": 2,
  "translate_tabs_to_spaces": true,
  "ensure_newline_at_eof_on_save": true,
  "trim_trailing_white_space_on_save": true,

  "find_selected_text": true,

  "auto_complete_commit_on_tab": true,

  "close_windows_when_empty": false,

  "ignored_packages":["vintage"]
}
コンマのつけ忘れや外し忘れに注意してください。
あと、"ignored_packages":["vintage"]を "ignored_packages":[]にするとSublime Text をVimっぽくできます。詳しくは公式ドキュメントを。
2012-12-3 追記
- コーディングスタイル的に好ましくない設定(
"indent_to_bracket": true,)があったので削除
Sublime Text 2 関連一覧
Sublime Text 2 のDefault設定ファイルを眺める
この記事ではDefault設定ファイルにどのような記述がされているか、その記述にどんな意味があるかを一つ一つ見ていきます。実際に設定をカスタマイズしてみたい方は、メニューのPreferencesタブの"Settings - User"からUser設定ファイルを開いてそこでいろいろ試してみましょう。
Sublime Text 2 のDefault設定ファイル
本文
Default設定ファイルとは、Sublime Text のデフォルトの動作の設定が記されたファイルのことです。Default設定ファイルはメニューのPreferencesタブの"Settings - Default"から開けます。
早速設定ファイルを眺めていきましょう。
設定ファイルは1個のJSONオブジェクトからなっています。このJSONオブジェクトに色々なプロパティを設定して、ひとつの設定ファイルとしているようですね。
そのJSONオブジェクトの前に、次のような但し書きがあります。
// While you can edit this file, it's best to put your changes in
// "User/Preferences.sublime-settings", which overrides the settings in here.
//
// Settings may also be placed in file type specific options files, for
// example, in Packages/Python/Python.sublime-settings for python files.
このファイルを編集することもできますが、設定の変更は"User/Preferences.sublime-settings"(いわゆるSettings-Userファイル)に書くのがベストです。そこでの設定は、このDefault設定ファイルの設定を上書きしてくれます。
ファイルタイプ毎に設定ファイルがあるかもしれません。たとえば"Packages/Python/Python.sublime-settings"はPython用の設定ファイルです。
Sublime Text の設定を変えたいときは、User設定ファイルに変更したい設定を書くようにしましょうということですね。
…それではJSONオブジェクトの中身を上から順に見ていきます。1個目のプロパティは"color_scheme"です。
color_scheme
// Sets the colors used within the text area
"color_scheme": "Packages/Color Scheme - Default/Monokai.tmTheme",
これでテキストエリアの色合いを設定しています。
font_face, font_size
// Note that the font_face and font_size are overriden in the platform
// specific settings file, for example, "Preferences (Linux).sublime-settings".
// Because of this, setting them here will have no effect: you must set them
// in your User File Preferences.
"font_face": "",
"font_size": 10,
フォントの種類と、フォントのサイズです。ただし、Default設定ファイルに書かれた値はPlatform設定ファイルに上書きされるため、ここに書いても意味が無いそうです。
font_options
// Valid options are "no_bold", "no_italic", "no_antialias", "gray_antialias",
// "subpixel_antialias", "no_round" (OS X only) and "directwrite" (Windows only)
"font_options": [],
フォントのオプション。配列で複数指定可。太字・斜体を使わない、アンチエイリアスをかけない、などなど。
word_separators
// Characters that are considered to separate words
"word_separators": "./\\()\"'-:,.;<>~!@#$%^&*|+=[]{}`~?",
単語の切れ目の判定。関連: Sublime Text 2でHTML要素のクラス名やIDの選択を少しだけ楽にする設定
line_number
// Set to false to prevent line numbers being drawn in the gutter
"line_numbers": true,
行番号の表示。
gutter
// Set to false to hide the gutter altogether
"gutter": true,
ガーターの表示。テキストエリア左側の領域のことです。
margin
// Spacing between the gutter and the text
"margin": 4,
ガーターとテキストエリアの間の幅。
fold_buttons
// Fold buttons are the triangles shown in the gutter to fold regions of text
"fold_buttons": true,
テキスト(関数やHTML要素)を折り畳むためのボタンの表示。
fade_fold_buttons
// Hides the fold buttons unless the mouse is over the gutter
"fade_fold_buttons": true,
折り畳むボタンを隠す。ガーターにマウスポインタをかざすことで表示。
rulers
// Columns in which to display vertical rulers
"rulers": [],
ルーラーの設定。[80, 120]のように複数指定可能。
spell_check
// Set to true to turn spell checking on by default
"spell_check": false,
スペルチェックを表示する。F6キーでも切り替えられますね。
tab_size
// The number of spaces a tab is considered equal to
"tab_size": 4,
タブ文字の大きさ。インデントの幅の設定でもあります。
translate_tabs_to_spaces
// Set to true to insert spaces when tab is pressed
"translate_tabs_to_spaces": false,
タブ文字をスペースに変換。タブキーを押した際に、タブ文字ではなくスペースが入力されるようになります。
use_tab_stops
// If translate_tabs_to_spaces is true, use_tab_stops will make tab and
// backspace insert/delete up to the next tabstop
"use_tab_stops": true,
タブストップ。"translate_tabs_to_spaces": trueのとき、Deleteキーを押すとtab_size分だけスペースが削除されます。
detect_indentation
// Set to false to disable detection of tabs vs. spaces on load
"detect_indentation": true,
インデントの検出。ファイルを読み込むと自動的にtranslate_tabs_to_spacesとtab_sizeを設定してくれるそうです。
auto_indent
// Calculates indentation automatically when pressing enter
"auto_indent": true,
オートインデント。
smart_indent
// Makes auto indent a little smarter, e.g., by indenting the next line
// after an if statement in C. Requires auto_indent to be enabled.
"smart_indent": true,
スマートインデント。
indent_to_bracket
// Adds whitespace up to the first open bracket when indenting. Requires
// auto_indent to be enabled.
"indent_to_bracket": false,
括弧までインデント。下みたいな書き方をよくする人には便利かも。
function(100,
         200,
         300);
array = ["foo",
         "bar",
         "bazz"];
trim_automatic_white_space
// Trims white space added by auto_indent when moving the caret off the
// line.
"trim_automatic_white_space": true,
オートインデントによってできた空行のインデントを取り除く。trueにすると、カーソルが空行から離れるときに、オートインデントによって挿入されたインデントが削除されます。
word_wrap
// Disables horizontal scrolling if enabled.
// May be set to true, false, or "auto", where it will be disabled for
 source code, and otherwise enabled.
"word_wrap": "auto",
テキストを折り返す。"auto"の動作: ファイルがプログラムのソースコードなら折り返さない。普通のテキストファイルなら折り返す。
wrap_width
// Set to a value other than 0 to force wrapping at that column rather than the
// window width
"wrap_width": 0,
どこで折り返すか。0ならウインドウの幅、それ以外ならその数値分の文字数で折り返されます。
indent_subsequent_lines
// Set to false to prevent word wrapped lines from being indented to the same
// level
"indent_subsequent_lines": true,
折り返し後の文頭位置。trueなら同じインデントの階層までインデントされます。
draw_centered
// Draws text centered in the window rather than left aligned
"draw_centered": false,
テキストを中心寄りに置く?。
auto_match_enabled
// Controls auto pairing of quotes, brackets etc
"auto_match_enabled": true,
閉じ括弧などを補完する。trueにすると、(や"と入力したときに自動で)や"が補完されます。
dictionary
// Word list to use for spell checking
"dictionary": "Packages/Language - English/en_US.dic",
辞書の指定。
draw_minimap_border
// Set to true to draw a border around the visible rectangle on the minimap.
// The color of the border will be determined by the "minimapBorder" key in
// the color scheme
"draw_minimap_border": false,
ミニマップの縁を描画する。
highlight_line
// If enabled, will highlight any line with a caret
"highlight_line": true,
現在行を強調する。
caret_style
// Valid values are "smooth", "phase", "blink", "wide" and "solid".
"caret_style": "smooth",
カーソルのスタイル。
match_brackets
// Set to false to disable underlining the brackets surrounding the caret
"match_brackets": true,
対応する括弧にアンダーラインを引く。
match_brackets_content
// Set to false if you'd rather only highlight the brackets when the caret is
// next to one
"match_brackets_content": true,
括弧内での括弧の強調。falseにするとカーソル上に括弧がある場合のみ、括弧にアンダーラインを引きます。
match_brackets_square
// Set to false to not highlight square brackets. This only takes effect if
// match_brackets is true
"match_brackets_square": true,
対応する四角括弧[]の強調。
match_brackets_braces
// Set to false to not highlight curly brackets. This only takes effect if
// match_brackets is true
"match_brackets_braces": true,
対応する波括弧{}の強調。
match_brackets_angle
// Set to false to not highlight angle brackets. This only takes effect if
// match_brackets is true
"match_brackets_angle": false,
対応する山括弧<>の強調。
match_tags
// Enable visualization of the matching tag in HTML and XML
"match_tags": true,
対応する開きタグと閉じタグの強調。
match_selection
// Highlights other occurrences of the currently selected text
"match_selection": true,
同じ単語の強調。単語を選択するとそれと同じ単語が白い枠で強調されます。
line_padding_top
// Additional spacing at the top of each line, in pixels
"line_padding_top": 0,
行の上側の余白。
line_padding_bottom
// Additional spacing at the bottom of each line, in pixels
"line_padding_bottom": 0,
行の下側の余白。
scroll_past_end
// Set to false to disable scrolling past the end of the buffer.
// On OS X, this value is overridden in the platform specific settings, so
// you'll need to place this line in your user settings to override it.
"scroll_past_end": true,
ファイル最終行を越えたスクロール。
move_to_limit_on_up_down
// This controls what happens when pressing up or down when on the first
// or last line.
// On OS X, this value is overridden in the platform specific settings, so
// you'll need to place this line in your user settings to override it.
"move_to_limit_on_up_down": false,
ファイル先頭行及び最終行における上下移動の振る舞い。trueにすると、例えばファイル先頭行で上キーを押すとファイル先頭行の行頭にカーソルが移動します。
draw_white_space
// Set to "none" to turn off drawing white space, "selection" to draw only the
// white space within the selection, and "all" to draw all white space
"draw_white_space": "selection",
スペースの描画。none:描画しない。selection:範囲選択時のみ描画。all:常に描画。
draw_indent_guides
// Set to false to turn off the indentation guides.
// The color and width of the indent guides may be customized by editing
// the corresponding .tmTheme file, and specifying the colors "guide",
// "activeGuide" and "stackGuide"
"draw_indent_guides": true,
インデントの補助線の描画。点線のやつです。
indent_guide_options
// Controls how the indent guides are drawn, valid options are
// "draw_normal" and "draw_active". draw_active will draw the indent
// guides containing the caret in a different color.
"indent_guide_options": ["draw_normal"],
インデントの補助線のオプション。
trim_trailing_white_space_on_save
// Set to true to removing trailing white space on save
"trim_trailing_white_space_on_save": false,
保存時に行末の空白を削除する。
ensure_newline_at_eof_on_save
// Set to true to ensure the last line of the file ends in a newline
// character when saving
"ensure_newline_at_eof_on_save": false,
ファイルの最終行が改行で終わるのを確実にする。ファイルの最終行は改行で終わるべき…
save_on_focus_lost
// Set to true to automatically save files when switching to a different file
// or application
"save_on_focus_lost": false,
別のタブやウィンドウにフォーカスが移ると自動で保存する。
fallback_encoding
// The encoding to use when the encoding can't be determined automatically.
// ASCII, UTF-8 and UTF-16 encodings will be automatically detected.
"fallback_encoding": "Western (Windows 1252)",
文字のエンコードを特定できないときに自動的に指定するエンコード。
default_encoding
// Encoding used when saving new files, and files opened with an undefined
// encoding (e.g., plain ascii files). If a file is opened with a specific
// encoding (either detected or given explicitly), this setting will be
// ignored, and the file will be saved with the encoding it was opened
// with.
"default_encoding": "UTF-8",
デフォルトのエンコーディング。
enable_hexadecimal_encoding
// Files containing null bytes are opened as hexadecimal by default
"enable_hexadecimal_encoding": true,
十六進のエンコーディングを有効にする?。
default_line_ending
// Determines what character(s) are used to terminate each line in new files.
// Valid values are 'system' (whatever the OS uses), 'windows' (CRLF) and
// 'unix' (LF only).
"default_line_ending": "system",
デフォルトの改行コード。
tab_completion
// When enabled, pressing tab will insert the best matching completion.
// When disabled, tab will only trigger snippets or insert a tab.
// Shift+tab can be used to insert an explicit tab when tab_completion is
// enabled.
"tab_completion": true,
タブキーによる補完。ちなみに補完候補の選択を誤ったときは、Ctrl+Spaceで選択をやり直すことができます。
auto_complete
// Enable auto complete to be triggered automatically when typing.
"auto_complete": true,
オートコンプリート。
auto_complete_size_limit
// The maximum file size where auto complete will be automatically triggered.
"auto_complete_size_limit": 4194304,
補完候補が自動で表示されるファイルの最大サイズ。
auto_complete_delay
// The delay, in ms, before the auto complete window is shown after typing
"auto_complete_delay": 50,
補完候補表示の遅延。
auto_complete_selector
// Controls what scopes auto complete will be triggered in
"auto_complete_selector": "source - comment",
オートコンプリートの有効な場所の指定。"source"、"text, source"などなど。
auto_complete_triggers
// Additional situations to trigger auto complete
"auto_complete_triggers": [ {"selector": "text.html", "characters": "<"} ],
オートコンプリートのより詳細なシチュエーション。
auto_complete_commit_on_tab
// By default, auto complete will commit the current completion on enter.
// This setting can be used to make it complete on tab instead.
// Completing on tab is generally a superior option, as it removes
// ambiguity between committing the completion and inserting a newline.
"auto_complete_commit_on_tab": false,
補完候補の選択にタブキーのみを用いる。falseにするとエンターキーでも補完候補を選択できるようになります。trueにしておくと、改行したいのに補完選択をしてしまうということがなくなります。
auto_complete_with_fields
// Controls if auto complete is shown when snippet fields are active.
// Only relevant if auto_complete_commit_on_tab is true.
"auto_complete_with_fields": false,
スニペットフィールド上でもオートコンプリートを有効にする。スニペットの中にはいくつかのプレースホルダを持つものがありますが、このプレースホルダの書き換え時にもオートコンプリートを表示するかどうかという設定です。falseにしておくと、補完選択が邪魔になって次のプレースホルダに移れないということがなくなります。
shift_tab_unindent
// By default, shift+tab will only unindent if the selection spans
// multiple lines. When pressing shift+tab at other times, it'll insert a
// tab character - this allows tabs to be inserted when tab_completion is
// enabled. Set this to true to make shift+tab always unindent, instead of
// inserting tabs.
"shift_tab_unindent": false,
Shit+Tabでインデントを減らす。trueにすると行のどこにいてもShit+Tabでインデントを減らすことができるようになります。
find_selected_text
// If true, the selected text will be copied into the find panel when it's
// shown.
// On OS X, this value is overridden in the platform specific settings, so
// you'll need to place this line in your user settings to override it.
"find_selected_text": true,
選択している文字を自動で検索語に指定。文字を選択している状態でCtrl+Fなどをすると、選択中の文字が自動的に検索テキストボックスにコピーされます。
drag_text
// When drag_text is enabled, clicking on selected text will begin a
// drag-drop operation
"drag_text": true,
テキストのドラッグ。選択しているテキストをドラッグアンドドロップできるようになります。
UI
//
// User Interface Settings
//
theme
// The theme controls the look of Sublime Text's UI (buttons, tabs, scroll bars, etc)
"theme": "Default.sublime-theme",
テーマ。
scroll_speed
// Set to 0 to disable smooth scrolling. Set to a value between 0 and 1 to
// scroll slower, or set to larger than 1 to scroll faster
"scroll_speed": 1.0,
スクロールの速度。0にするとスムーズスクロールが無効になります。
tree_animation_enabled
// Controls side bar animation when expanding or collapsing folders
"tree_animation_enabled": true,
フォルダツリーのアニメーション。サイドバーのフォルダの開閉やファイル追加・削除等のアニメーションのことです。
highlight_modified_tabs
// Makes tabs with modified files more visible
"highlight_modified_tabs": false,
変更されたタブをさらに強調。文字色が変わるようになります。
show_tab_close_buttons
"show_tab_close_buttons": true,
タブを閉じるボタンの表示。
bold_folder_labels
// Show folders in the side bar in bold
"bold_folder_labels": false,
サイドバーのフォルダ名を太字にする。
use_simple_full_screen
// OS X 10.7 only: Set to true to disable Lion style full screen support.
// Sublime Text must be restarted for this to take effect.
"use_simple_full_screen": false,
OS X 用の設定。Lionスタイルのフルスクリーンモードを無効にする。
overlay_scroll_bars
// Valid values are "system", "enabled" and "disabled"
"overlay_scroll_bars": "system",
スクロールバーを重ねる。
アプリケーションの振る舞い
//
// Application Behavior Settings
//
hot_exit
// Exiting the application with hot_exit enabled will cause it to close
// immediately without prompting. Unsaved modifications and open files will
// be preserved and restored when next starting.
//
// Closing a window with an associated project will also close the window
// without prompting, preserving unsaved changes in the workspace file
// alongside the project.
"hot_exit": true,
hot_exitの設定。hot_exitを有効にすると、アプリケーションの終了時に保存確認のダイアログなどを出さずにすぐにアプリケーションを終了します。編集中のファイルは次回起動時に復元されます。
remember_open_files
// remember_open_files makes the application start up with the last set of
// open files. Changing this to false will have no effect if hot_exit is
// true
"remember_open_files": true,
開いていたファイルを記憶。アプリケーションの起動時に前回開いていたファイルを開きなおしてくれます。hot_exitを有効にしている場合はこの設定をfalseにしても問題ありません。
open_files_in_new_window
// OS X only: When files are opened from finder, or by dragging onto the
// dock icon, this controls if a new window is created or not.
"open_files_in_new_window": true,
ファイルを開く際に新しいウィンドウで開く。OS Xのみの機能。
create_window_at_startup
// OS X only: This controls if an empty window is created at startup or not.
"create_window_at_startup": true,
アプリケーション起動時に必ずウィンドウを作るようにする。OS Xのみの機能。前回終了時にウィンドウを全て閉じていた場合の挙動についてです。設定がtrueの場合、アプリケーション起動時に空のウィンドウが作られます。falseの場合、ウィンドウは作られずにアプリケーションの起動のみが行われます。
close_windows_when_empty
// Set to true to close windows as soon as the last file is closed, unless
// there's a folder open within the window. This is always enabled on OS X,
// changing it here won't modify the behavior.
"close_windows_when_empty": false,
ウィンドウのタブが無くなったらウインドウを閉じる。
show_full_path
// Show the full path to files in the title bar.
// On OS X, this value is overridden in the platform specific settings, so
// you'll need to place this line in your user settings to override it.
"show_full_path": true,
タイトルバーにファイルのフルパスを表示。
show_panel_on_build
// Shows the Build Results panel when building. If set to false, the Build
// Results can be shown via the Tools/Build Results menu.
"show_panel_on_build": true,
ビルド時にビルド結果のパネルを表示。
preview_on_click
// Preview file contents when clicking on a file in the side bar. Double
// clicking or editing the preview will open the file and assign it a tab.
"preview_on_click": true,
クリックでファイルをプレビュー。サイドバーのファイルをクリックした際にタブを作らずに内容を表示します。
folder_exclude_patterns, file_exclude_patterns
// folder_exclude_patterns and file_exclude_patterns control which files
// are listed in folders on the side bar. These can also be set on a per-
// project basis.
"folder_exclude_patterns": [".svn", ".git", ".hg", "CVS"],
"file_exclude_patterns": ["*.pyc", "*.pyo", "*.exe", "*.dll", "*.obj","*.o", "*.a", "*.lib", "*.so", "*.dylib", "*.ncb", "*.sdf", "*.suo", "*.pdb", "*.idb", ".DS_Store", "*.class", "*.psd", "*.db"],
サイドバーから除外するフォルダ、ファイルの設定。
binary_file_patterns
// These files will still show up in the side bar, but won't be included in
// Goto Anything or Find in Files
"binary_file_patterns": ["*.jpg", "*.jpeg", "*.png", "*.gif", "*.ttf", "*.tga", "*.dds", "*.ico", "*.eot", "*.pdf", "*.swf", "*.jar", "*.zip"],
バイナリファイルの指定。
ignored_packages
// List any packages to ignore here. When removing entries from this list,
// a restart may be required if the package contains plugins.
"ignored_packages": ["Vintage"]
無視するパッケージ。ちなみにこの"Vintage"をignored_packagesから外せば、Sublime Text をVimっぽくすることができます。
Sublime Text 2 関連一覧
Sublime Text 2 の内部の概観
Windowsのportable versionを例に、Sublime Text 2 がどのように構成されているかを見ていきます。
Sublime Text 2.0.1/

アプリケーションの最上位の階層です。実行ファイルとフォルダがあるほかはdllファイルやPythonスクリプトなどが雑然と置かれているだけです。
sublime_text.exe
Sublime Text 2 の実行ファイルです。
Pristine Packages/
初回起動時にインストールされるパッケージ(プラグイン)がまとめて置かれています。基本的にノータッチ。
Data/
パッケージフォルダなど重要なデータが置かれます。
Sublime Text 2.0.1/Data/
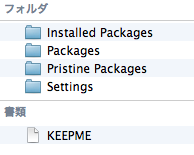
Installed Packages/
Package Controllがあるため、あまり使うことはないかと思いますが、手動でパッケージをインストールする場合はこのフォルダにインストールしたいパッケージのsublime-packageファイル(パッケージをzip形式で固めたもの)を置いてSublime Text を再起動します。
Packages/
インストールしたパッケージやテーマや設定ファイルなどが置かれています。
Pristine Packages/
上にあったPristine Packagesと同じものです。
Settings/
前回の状態を記憶するセッションファイルなどが置かれます。
Sublime Text 2.0.1/Data/Packages/
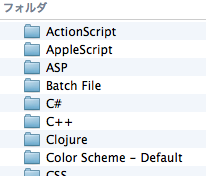
Color Scheme - Default/
デフォルトのカラースキーム。
Default/
デフォルトの設定ファイルやコマンドのスクリプトファイルなど。
User/
ユーザーの設定ファイルなど。
Sublime Text 2 関連一覧
Sublime Text 2 のDefault設定ファイルを眺める(旧)
という記事を書いたけど、はてなブログでは表示が崩れてしまう。
仕方ないからGistに置いとこう。
はやくはてなブログでもMarkdown記法が使えるようになるといいのになあ。
https://gist.github.com/3620658
追記
はてな記法でも十分便利でしたm(__)m → はてなブログ版
追記2
はてなブログもMarkdown記法で書けるようになりましたm(__)m → Markdown記法に対応しました - はてなブログ開発ブログ
Sublime Text 2 のメニュー項目一覧
追記
メニューの日本語化やショートカットキーの一覧(日本語付き)がありました。これを使えば分かりやすくなりそうです。
Fileタブ
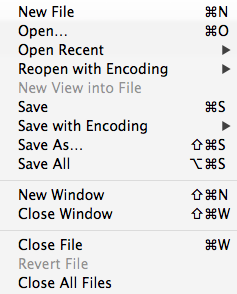
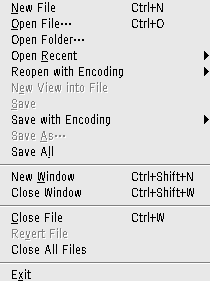
New File
新しくファイルを作る。
Open File
ファイルを開く。
Open Folder
フォルダを開く。開くとエディタの左側にファイラが表示されるようになります。便利。
Open Recent
最近開いたファイルまたはフォルダを開く。
Reopen with Encoding
別のエンコードで開き直す。開いたファイルが文字化けしていたときに使います。
New View into File
今開いているファイルを新しいタブでもう一度開く。
Save
保存。
Save with Encoding
エンコーディングを指定して保存。
Save As…
名前を付けて保存。
Save All
全て保存。
New Window
新しいウィンドウを開く。
Close Window
ウィンドウを閉じる。
Close File
今開いているファイルを閉じる。
Revert File
今開いているファイルを開き直す。
Close All Files
全てのファイルを閉じる。
Exit
Sublime Text 2 の終了。
Editタブ
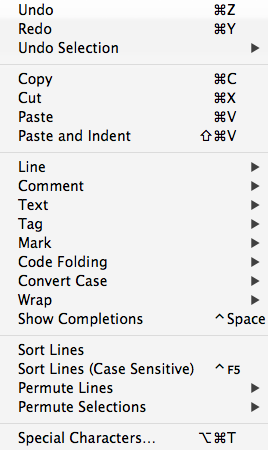
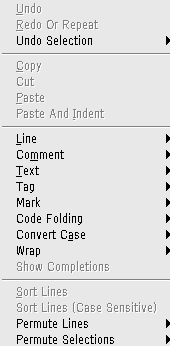
Undo
アンドゥ。間違った操作を取り消すことができます。
Redo
リドゥ。アンドゥを取り消すことができます。
Undo Selection
選択範囲のアンドゥ。例えばCtrl+Dを押しすぎて、複数選択したくないのに複数選択してしまったときにこれをすると選択範囲を一つ前の状態に狭めることができます。
Copy
コピー。ちなみに何も選択していない状態でCopyをすると、カーソルがある行をコピーしてくれます。便利。
Cut
カット。Copyと同じで、何も選択していない状態で使うとカーソルがある行をカットしてくれます。また、ただ単に行を削除したいときにも使います。
Paste
ペースト。
Paste and Indent
ペーストしてインデント。Pasteを使ってコードの貼り付けをしていると、ときどきインデントが崩れることがあります。そういうときにはShiftキーを押しながらペーストしましょう。
Line
Indent
行を字下げします。
Unindent
行の字下げを削除します。
Reindent
行を正しいインデントに直します。
Swap Line Up
選択行と上の行を交換します。選択行の内容が一行上に移動する感じです。
Swap Line Down
選択行と下の行を交換します。選択行の内容が一行下に移動する感じです。
Duplicate Line
行の複製。選択行をそのまま下の行に複製します。範囲選択中に使うと選択領域のテキストのみが複製されます。
Delete Line
行の削除。Cutでも同じようなことはできます(クリップボードの内容が書き換わりますが)。
Join Line
行の連結。選択行とその下の行との間の改行を消して連結します。
Comment
Toggle Comment
選択行をコメントにする/コメントを外す。便利。
Toggle Block Comment
選択行をブロックコメントで囲む/ブロックコメントを外す。
Text
Insert Line Befor
前の行に新しい行を挿入。VimでいうOです。便利。
Insert Line After
次の行に新しい行を挿入。Vimでいうoです。便利。
Delete Word Forward
単語のカーソルから前の部分を削除。
Delete Word Backward
単語のカーソルから後ろの部分を削除。
Delete Line
行の削除。(上にもありましたが)
Delete to End
カーソル位置から行末まで削除。
Delete to Beginning
カーソル位置から行頭まで削除。
Transpose
次の単語(文字)と入れ替え。
Tag
HTMLやXMLのタグ編集関係のコマンド
Mark
マーク関係のコマンド。
Code Folding
コードの折りたたみ関係のコマンド。
Convert Case
大文字小文字関係のコマンド。
Wrap
行の折り返し関係のコマンド。
Show Completions
補完候補を表示。
Sort Lines
ファイルの行をソート。
Sort Lines(Case Sensitive)
ファイルの行をソート(大文字小文字を区別)。
Permute Lines
Reverse
ファイルの行の順番を反転。
Unique
重複行を取り除く。
Shuffle
行をランダムに並び替える。
Permute Selections
選択部分についての並び替え?。
Selectionタブ
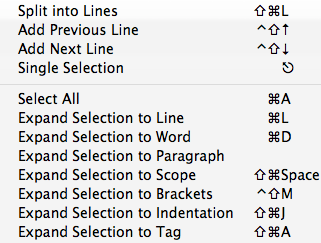
Split into Lines
全ての選択行の行末にカーソルを置く。この状態で(や"を入力すると…
Add Previous Line
前行にカーソルを追加。複数の行を同時に編集したいときや、矩形選択をしたいときなどに使います。
Add Next Line
次行にカーソルを追加。
Simgle Selection
カーソルを一つにする。カーソルが多くなりすぎたときはEscキーで普通の状態に戻せます。
Select All
全ての行を選択。
Expand Selection to Line
行を選択。
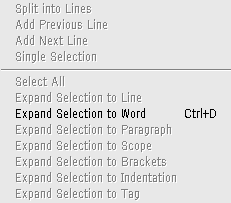
Expand Selection to Word
単語を選択。Sublime Text のトップページでも紹介されている機能(ファイル中の全てのlenという変数をlengthに書き換えている)です。手っ取り早く変数名を置換したいときなどに便利そうです。
Expand Selection to Paragraph
段落を選択。ブラウザでいうトリプルクリックみたいなものです。
Expand Selection to Scope
スコープを選択。
Expand Selection to Brackets
括弧の中を選択。
Expand Selection to Indentation
インデントの同じ階層のものを選択。
Expand Selection to Tag
HTMLやXMLの要素の中身を選択。いわゆるinnerHTML。
Findタブ
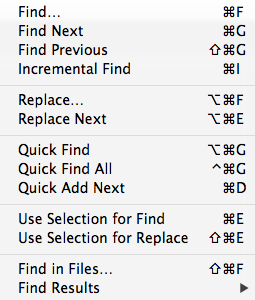
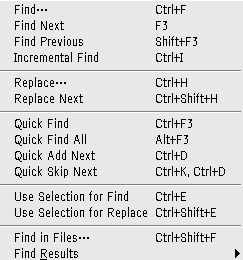
Find…
検索。
Find Next
次のマッチした場所へ。
Find Previous
前のマッチした場所へ。
Incremental Find
インクリメンタルサーチ。Findもインクリメンタルサーチのような…
Replace…
置換。
Replace Next
次を置換。
Quick Find
選択している単語を検索。
Quick Find All
選択している単語を検索し、全て選択。手っ取り早く置換したいときに便利そうです。
Quick Add Next
単語を選択。Expand Selection to Wordと同じです。
Use Selection for Find
選択している語を検索ワードに指定。検索するときにいちいちコピー&ペーストしなくていいので楽です。
Use Selection for Replace
選択している語を置換ワードに指定。
Find in Files…
複数のファイルから検索。
Find Results
Show Results Panel
リザルトパネルを表示。よく分かりません。
Next Results
次のマッチしたポイントへ。
Previous Results
前のマッチしたポイントへ。
Viewタブ
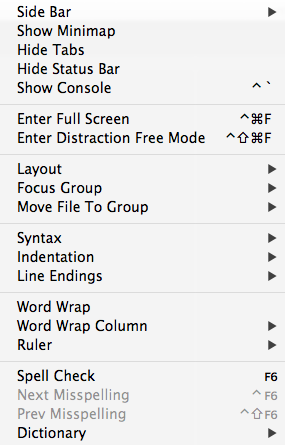
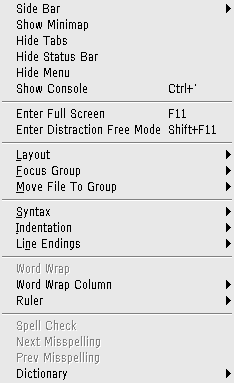
Side Bar
Show/Hide Side Bar
サイドバーを表示/非表示。
Show/Hide Open Files
開いているファイル一覧をサイドバーに表示/非表示。
Show/Hide Minimap
ミニマップを表示/非表示。
Show/Hide Tabs
タブを表示/非表示。
Show/Hide Status Bar
ステータスバーを表示/非表示。エディタ下端にあるやつです。
Show/Hide Console
コンソールを表示/非表示。Escキーでも非表示にできます。
Enter/Exit Full Screen
フルスクリーンにする/フルスクリーンをやめる。
Enter/Exit Distraction Free Mode
Distraction Free Modeにする/Distraction Free modeをやめる。Distraction Free Modeは、UIパーツなどを全て隠してコーディングに集中するためのモードのようです。詳しくは公式ドキュメントを見てください。
Layout
ウィンドウの分割など。縦や横やグリッドに分割できます。便利。
Focus Group
フォーカスの移動。ウィンドウを分割して編集しているときに使います。
Move File To Group
タブを別のグループに移動。一応タブをドラッグ&ドロップすることででも移動させることができます。
Syntax
言語の指定。大体の場合、自動的に拡張子から推測してくれますけど。ファイルに保存するほどでもないような小さいコードを新しいタブで書くときに使うかもしれません。
Indentation
Indent Using Spaces(on/off)
インデントにスペースを用いるか、タブ文字を用いるか。スペースを用いるほうがおすすめです。が、ここでは設定せずに設定ファイルのほうでまとめて設定しましょう。
Tab Width: 1 / 2 / 3 / ..
タブの横幅。タブ文字やインデントの横幅を指定できます。が、これもここではなく設定ファイルのほうで指定しましょう。
Guess Settings From Buffer
現在のファイルからインデント幅を推測。他人のコードをいじるときに使うかもしれません。
Convert Indentation to Spaces/Tabs
インデント文字の変換。開いているファイルのインデントに使われている文字をタブからスペース、あるいはスペースからタブに変換できます。
Line Endings
改行コードの指定。
Word Wrap(on/off)
行の折り返しを有効/無効にする。ここで設定してもいいですが、設定ファイルのほうで設定したほうが後々ためになります。
Word Wrap Column(auto/70/79/…)
どこで行を折り返すかを指定。画面幅で自動的に折り返すか、文字数で指定するか選べます。が、これもここで設定せず設定ファイルに書き込むことにしましょう。
Ruler
ルーラーを指定する。80文字や120文字に設定しておくと目安になって分かりやすいです。が、これもここで設定せず設定ファイルで設定しましょう。設定ファイルの方だと複数のルーラーを指定できます。
Spell Check
スペルチェックをする。
Next Misspelling
次のミススペルへ。
Prev Misspelling
前のミススペルへ。
Dictionary
辞書の指定。
Gotoタブ
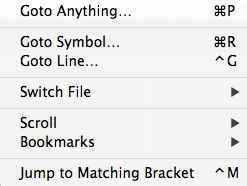
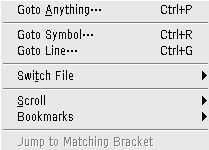
Goto Anything…
ファイル名を指定して移動。指定したファイルに移動します。ダイアログが邪魔ならEscキーで消せます(もう一度同じコマンドを入力しても消せます)。ちなみに下のGoto SymbolやGoto Lineと組み合わせてファイル名@シンボルやファイル名:行番号などとすることもできます。
Goto Symbol…
ファイル内のシンボルへ移動。
Goto Line…
ファイル内の指定した行へ移動。
Switch File
Next File
次のタブへ。
Previous File
前のタブへ。
Next File in Stack
最近見たタブへ。
Preious File in Stack
最近見たタブのひとつ前へ。Next File in Stackから戻ってくるときに使うんでしょうか。あんまり戻りすぎると一番昔に見たタブへ移動するみたいです。
Switch Header/Implementation
ヘッダーファイルと実装ファイルの切り替え。C言語系の編集をしているときに使います。foo.cを開いていればfoo.hに移動、foo.hを開いていればfoo.cに移動という感じ。
Scroll
Scroll to Selection
カーソル行が画面中央に来るようにスクロール。
Line Up
画面を一行上にスクロール。
Line Down
画面を一行下にスクロール。
Bookmarks
Toggle Bookmark
カーソル位置をブックマークする/ブックマークから外す。
Next Bookmark
次のブックマーク位置に移動。
Prev Bookmark
前のブックマーク位置に移動。
Clear Bookmarks
全てのブックマークを解除。
Select All Bookmarks
全てのブックマーク位置にカーソルを置く。
Jump to Matching Bracket
対応する括弧に移動。
Toolsタブ
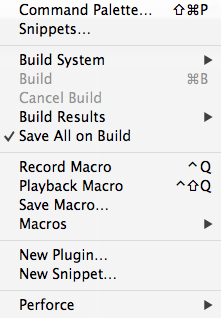
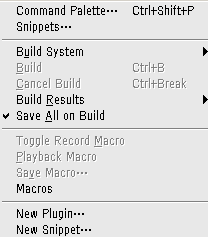
Command Palette…
コマンドパレットを開く。
Snippets…
スニペットを検索する。コマンドパレットで「Snippet:」と入力するのと同じです。
Build System
ビルドシステムの指定。
Build
ビルド。ソースコードをコンパイルし、ライブラリのリンクなども行い、実行可能ファイルを生成します。
Run
プログラムの実行。
Cancel Build
ビルドのキャンセル。
Build Results
ビルドした結果を表示する等。
Save All on Build(on/off)
ビルド前に全て保存。
Record Macro / Stop Recording Macro
マクロを記録/マクロの記録を終了。人間の編集操作を記録するコマンドです。
Playback Macro
マクロを再生。
Save Macro…
マクロを保存。
Macros
マクロ一覧。
New Plugin…
プラグインの追加。新しいプラグインを作成できます。
New Snippet
スニペットの追加。
Projectタブ
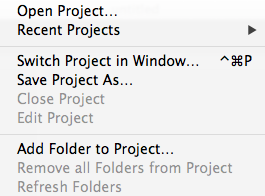
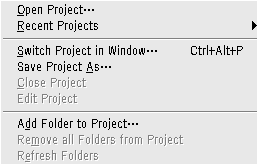
Open Project…
プロジェクトを開く。よく開くフォルダはプロジェクトとして保存しておくと便利です。
Recent Projects
最近開いたプロジェクト一覧。
Switch Project in Window…
このウィンドウで別のプロジェクトを開く。
Save Project As…
名前を付けてプロジェクトを保存。
Close Project
プロジェクトを閉じる。
Edit Project
プロジェクトの設定を編集する。
Add Folder to Project…
フォルダをプロジェクトに追加。
Remove all Folders from Project
全てのフォルダをプロジェクトから取り除く。
Refresh Folders
フォルダの再読み込み。
Preferencesタブ
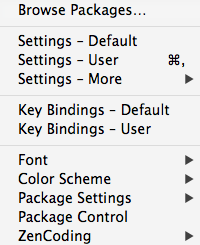
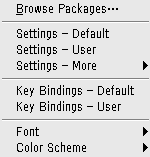
Browse Packages…
インストールしているパッケージの一覧。
Settings - Default
デフォルト動作の設定ファイル。基本的にはノータッチで。
Settings - User
ユーザー定義の設定ファイル。Sublime Text 2 のカスタマイズがしたくなったらまずはここを弄りましょう。Defaultの設定ファイルも参考になります。
Settings - More
Syntax Specific - User
特定の言語用の設定ファイル。例えば普通の言語では画面幅で折り返すが、HTMLの編集のときは自動折り返ししないようにしたい、といったときにHTML専用の設定ファイルを用意してそこに専用の設定を書くことができます。
Distraction Free - User
Distraction Free modeの設定ファイルです。
Key Bindings - Default
デフォルトのキーバインディング設定ファイル。これも基本的にはノータッチで。
Key Bindings - User
ユーザー定義のキーバインディング設定ファイル。
Font
Larger
文字を大きくする。
Smaller
文字を小さくする。
Reset
文字の大きさを設定値に戻す。
Color Scheme
カラースキームの変更。